Oven Repair Safety & Difficulty Checker
Select the symptom or component you are dealing with to see if it's a safe DIY project or a "Danger Zone" scenario.
Before you touch a single screw, you need to understand that an electric oven repair is fundamentally different from fixing a leaky tap. You are dealing with high-voltage electricity and combustible gases (if it's a hybrid). One wrong move with a multimeter or a loose wire can lead to electrical fires or severe shocks. However, if you're comfortable with basic tools and follow strict safety protocols, you can handle a surprising amount of the maintenance.
Quick Wins: Things You Can Definitely Fix
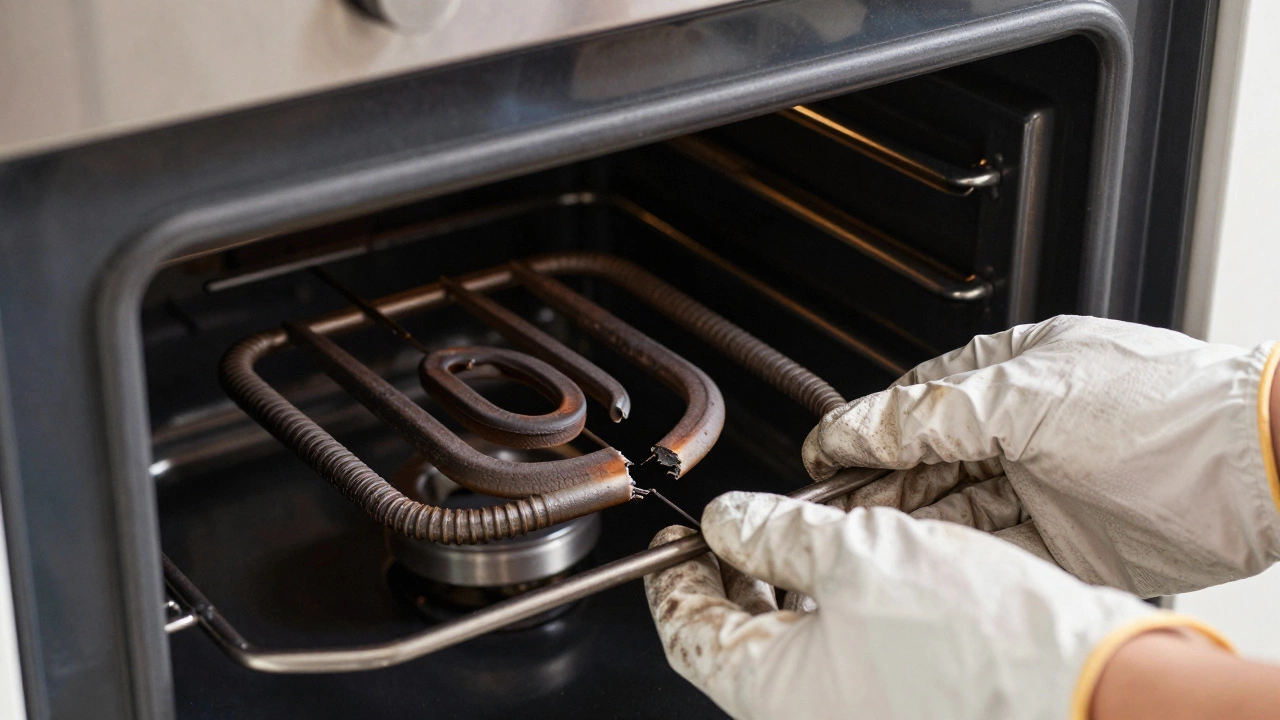
There are a few common culprits that don't require an engineering degree to solve. Often, an oven that "isn't working" is just suffering from a failed component that plugs right into the board. For instance, Bake Elements are the most common failure points. These are the heating coils at the bottom. If you see a blister or a break in the coil, it's dead. Replacing one is usually as simple as unplugging the old one and sliding in a new part that matches your model number.
Then there's the Door Seal (or gasket). If you notice heat escaping or the door doesn't close tight, your energy bills will spike and your food will cook unevenly. A worn-out seal is a tactile fix. You pull the old rubber strip out of the channel and press a new one in. It's low-risk and high-reward.
Door hinges are another area where DIY wins. If your oven door sags or won't stay shut, the springs in the hinges have likely lost their tension. Replacing these requires some patience and a screwdriver, but it's entirely doable without risking your life.
| Component | Risk Level | Tool Requirement | Skill Level |
|---|---|---|---|
| Door Gasket | Low | None/Basic | Beginner |
| Light Bulb | Low | Screwdriver | Beginner |
| Bake Element | Medium | Screwdriver/Wrench | Intermediate |
| Thermostat | High | Multimeter | Advanced |
The Danger Zone: When to Stop
You hit the "danger zone" the moment you have to touch the Control Board or the internal wiring. The control board is the brain of the oven. If your digital display is glitching or the oven is turning itself on and off, you're looking at a complex circuitry issue. While you can technically swap a board, diagnosing a short circuit requires a deep understanding of Electrical Engineering principles.
Gas leaks are the ultimate deal-breaker. If you have a dual-fuel oven and smell sulfur or rotten eggs, put the tools down and get out of the house. Gas lines require specialized pressure testing and certified sealing. A mistake here isn't just a broken appliance; it's a potential explosion. Ever wonder why professional gas fitters charge so much? It's because they carry the liability for your entire home's safety.
Another red flag is the Thermal Fuse. If this blows, it's usually a symptom of a larger overheating problem. Just replacing the fuse without finding out *why* it blew is like putting a band-aid on a broken leg. The root cause could be a failing cooling fan or a blocked vent, which could lead to a fire the next time you preheat to 250 degrees.
Essential Tools for the Home Fixer
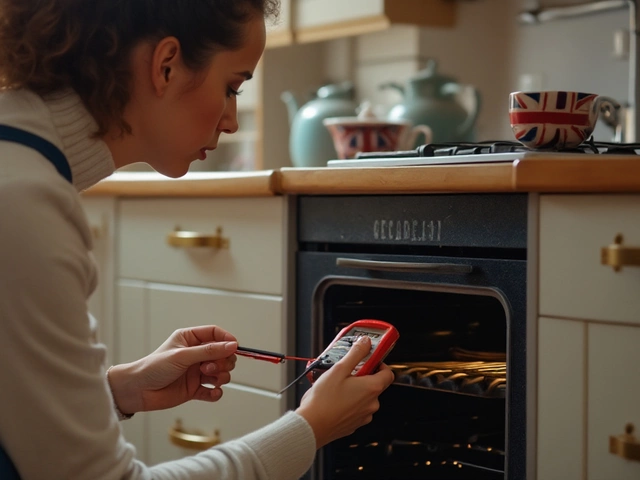
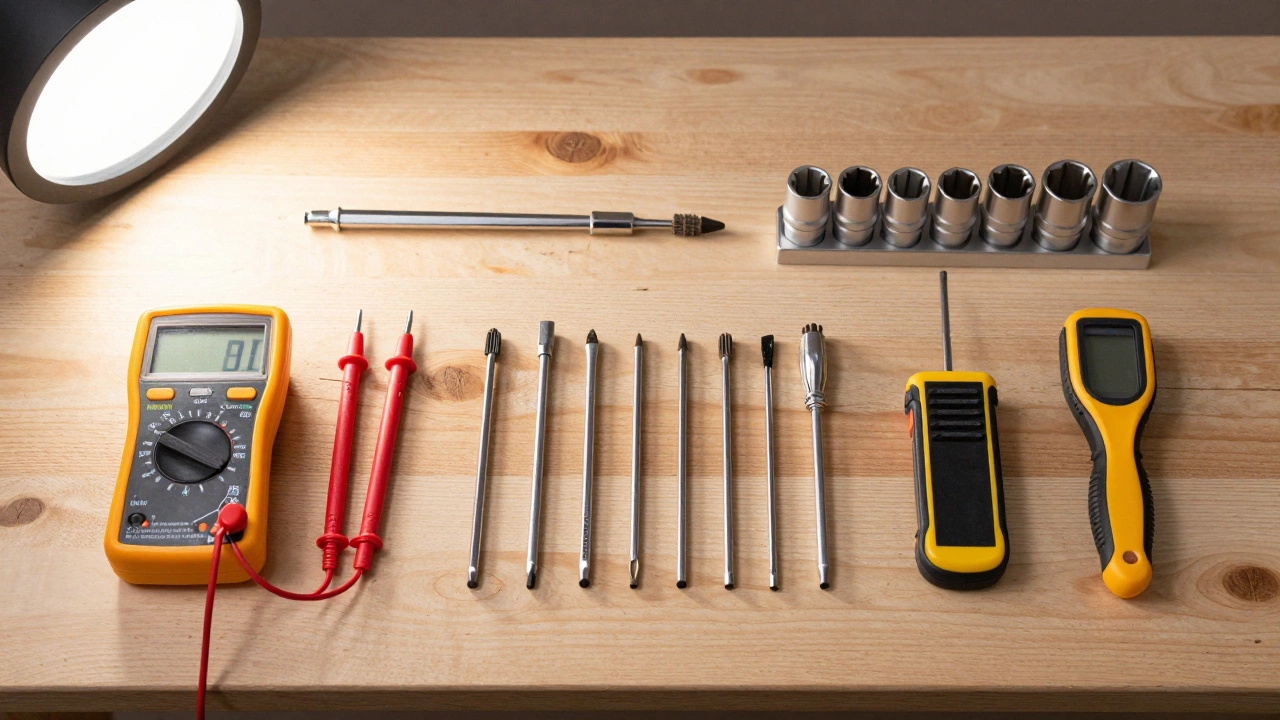
If you've decided that your issue is a "safe" one, you can't just wing it with a butter knife. You need a specific kit to avoid stripping screws or causing shorts. First, a Digital Multimeter is non-negotiable. This tool allows you to check for continuity. If you're testing a heating element, the multimeter tells you if the current can actually flow through the coil. If the reading is "infinite," the coil is snapped internally, and you've found your problem.
You'll also want a set of insulated screwdrivers and perhaps a socket set. Most modern ovens use Torx screws to prevent people from poking around, so a standard Phillips head won't always cut it. Lastly, a non-contact voltage tester is a lifesaver. It lets you verify that the power is truly off before you touch any wires, providing a crucial second layer of safety.
The Step-by-Step Approach to Diagnosis
Don't just start tearing the oven apart. Follow this logical flow to avoid making the problem worse:
- Power Down: Switch off the oven at the wall or, better yet, at the main circuit breaker. Never work on a live appliance.
- Visual Inspection: Open the oven and look for visible breaks in the elements or melted wires. Check the door seal for gaps.
- The Scent Test: Smell for burnt plastic (electrical short) or gas. If you smell gas, stop immediately.
- Isolation: If the oven doesn't heat, check if the broiler works. If the top heats but the bottom doesn't, the problem is likely just the bake element. If neither works, the issue is likely the Thermostat or the power supply.
- Testing: Use your multimeter to check the resistance of the suspected part. Compare this value to the manufacturer's specifications found in the service manual.
Common Pitfalls to Avoid
One of the biggest mistakes DIYers make is buying generic parts. It's tempting to grab a "universal" heating element from a cheap online marketplace, but oven tolerances are tight. A part that's slightly too long can warp the oven interior or create a gap where heat escapes. Always search by the specific model number found on the sticker inside the door frame.
Another common error is ignoring the Calibration process. If you replace a temperature sensor, your oven might "work," but it could be off by 20 degrees. This leads to raw chicken or burnt cakes. Most ovens have a calibration setting in the menu that allows you to offset the temperature to match an external oven thermometer.
Finally, don't forget the cleanup. While you have the oven disassembled, it's the perfect time to clean the hidden areas. Grease buildup around the heating elements can cause smoking or even small fires when the new part reaches full temperature. Use a degreaser on the chassis, but avoid getting chemicals on the electrical connections.
Is it safe to replace an oven element myself?
Yes, provided the power is completely disconnected at the circuit breaker. If you can comfortably remove a few screws and unplug a wire connector, replacing a bake or broil element is generally considered a safe DIY task. However, if you see charred wires or melted plastic around the connection, you should call a professional as this indicates a larger electrical fault.
Why is my oven not heating but the light is on?
This usually means the control board is receiving power, but the heating circuit is broken. The most likely causes are a blown thermal fuse, a failed heating element, or a faulty thermostat. Since the light works, you know the main power supply is intact, so the issue is localized to the heating components.
Can I use a multimeter to test my oven?
Absolutely. A multimeter is the best tool for diagnosing oven issues. You can use it to check for "continuity" in the heating elements. If the multimeter shows an open circuit (no continuity), the element is burnt out and needs replacement. Always ensure the oven is unplugged before testing components.
How do I know if my oven thermostat is broken?
Signs of a failing thermostat include the oven taking way too long to preheat, the temperature fluctuating wildly, or the oven failing to shut off when it reaches the set temperature. You can test this by using an independent oven thermometer; if the display says 200 degrees but the thermometer says 150, your thermostat or sensor is likely faulty.
When should I definitely call a professional technician?
Call a pro immediately if you smell gas, see sparks coming from the control panel, or if the oven is tripping the house circuit breaker every time you turn it on. These are signs of dangerous electrical shorts or gas leaks that can lead to fire or explosions. Additionally, any repair involving the main motherboard or gas valves should be left to certified technicians.
Next Steps and Troubleshooting
If you've tried the basic fixes and the oven still isn't behaving, it's time to evaluate the age of the appliance. If your oven is more than 15 years old, the cost of a professional repair-including call-out fees and parts-often exceeds 50% of the cost of a new, energy-efficient model. In these cases, upgrading is usually the smarter financial move.
For those who successfully completed a DIY fix, the next step is preventative maintenance. Every six months, check your door seals for cracks and clear any debris from the oven vents. Keeping the interior clean and the seals tight prevents the thermostat from working overtime, which extends the life of your heating elements and saves you from having to do another emergency repair in the middle of dinner prep.