Dishwasher Troubleshooting Assistant
Instructions: Select the problem you are experiencing below, then follow the diagnostic steps. Click "Mark Complete" after performing each action.
Select a problem to begin.
📈 Diagnosis Complete
There is nothing more frustrating than opening your dishwasher is a kitchen appliance designed to clean dishes using high-pressure water jets and detergents after a cycle only to find it still wet, dirty, or completely silent. Before you call a technician and hand over a hefty bill, you can often pinpoint the issue yourself. Diagnosing a dishwasher problem doesn't require a degree in engineering; it requires logic, safety awareness, and a systematic approach.
In this guide, we will walk you through the exact steps to identify common faults, from simple clogs to complex electrical failures. By following these diagnostic steps, you’ll save time and money while gaining confidence in handling household repairs.
Quick Summary / Key Takeaways
- Safety First: Always disconnect power before inspecting internal components to avoid electric shock.
- Check the Basics: Most issues stem from simple causes like a tripped breaker, closed water valve, or clogged filter.
- Listen and Look: Unusual noises often point to mechanical obstructions, while error codes provide specific electronic diagnostics.
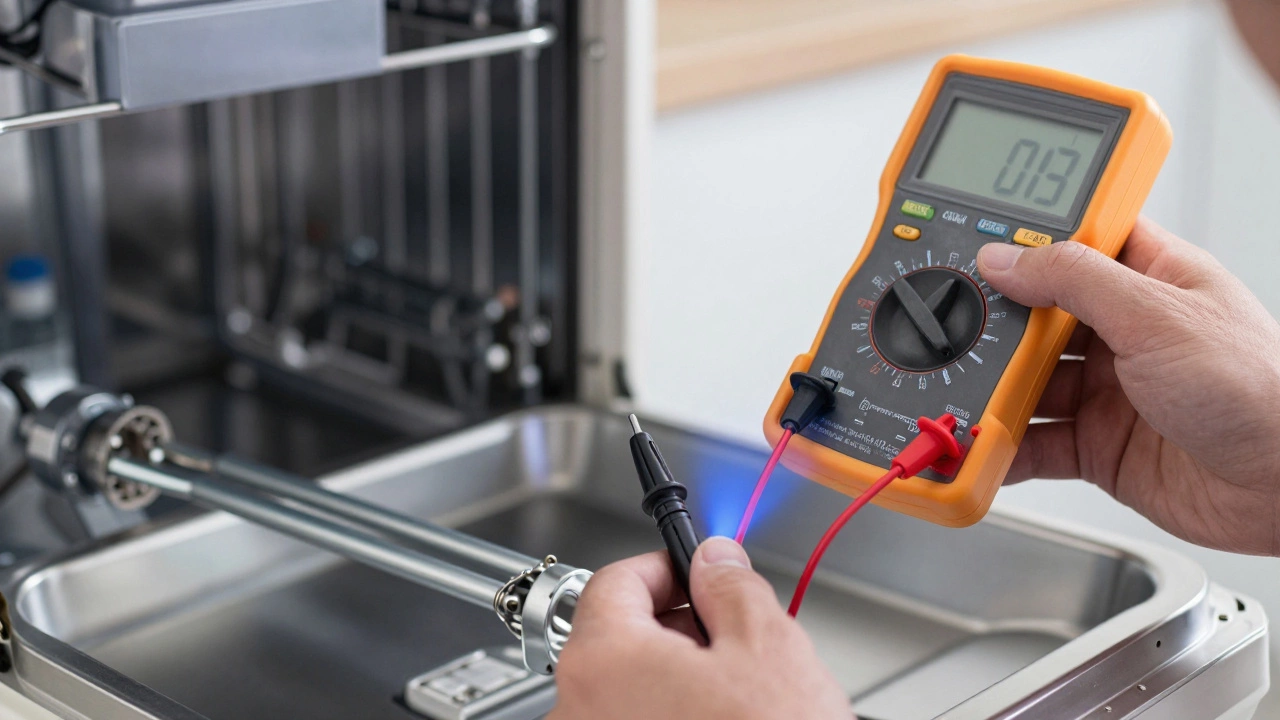
- Test Components: Use a multimeter to verify continuity in heating elements, door switches, and motors.
- Know When to Stop: If the control board or main motor fails, professional repair is usually more cost-effective.
Step 1: Ensure Safety and Power Supply
Before touching any part of the machine, you must ensure it is safe to work on. Electricity and water are a dangerous mix. Locate your circuit breaker panel and switch off the power dedicated to the dishwasher. This prevents accidental shocks if you accidentally touch live wires while investigating.
Once the power is cut, verify that the unit isn’t simply unplugged or disconnected. Underneath the kickplate at the bottom of the appliance, check if the power cord is securely plugged into the socket. If it’s hardwired, ensure the connections inside the junction box are tight. A loose wire can cause intermittent operation where the machine works one day and fails the next.
If the power is connected but the display is blank, check your home’s circuit breaker. Dishwashers draw significant current, especially when the heating element kicks in. A tripped breaker is a common culprit for sudden shutdowns. Reset the breaker and try running a short cycle. If it trips again immediately, there is likely a short circuit within the appliance, and you should stop testing and call a professional.
Step 2: Inspect Water Supply and Inlet Valve
If your dishwasher hums but no water enters the tub, the problem is likely related to water intake. First, ensure the hot water tap under the sink is fully open. It sounds obvious, but valves sometimes get bumped or turned off during cleaning.
Next, examine the water inlet valve is an electromechanical component that controls the flow of water into the dishwasher. Located at the back of the unit, this valve opens when the computer sends a signal. Over time, sediment from your water supply can clog the screen filter inside the valve. Remove the inlet hose, inspect the mesh filter for debris, and rinse it under running water. If the filter is clean but the valve still doesn’t open, use a multimeter to test for continuity. If there is no continuity, the solenoid coil has failed, and the valve needs replacement.
Also, check the water pressure. Low pressure can prevent the float switch from rising properly, causing the machine to think it’s already full and shutting down the fill cycle prematurely. You can test this by running the faucet connected to the dishwasher line; if the flow is weak, the issue might be with your home’s plumbing rather than the appliance.
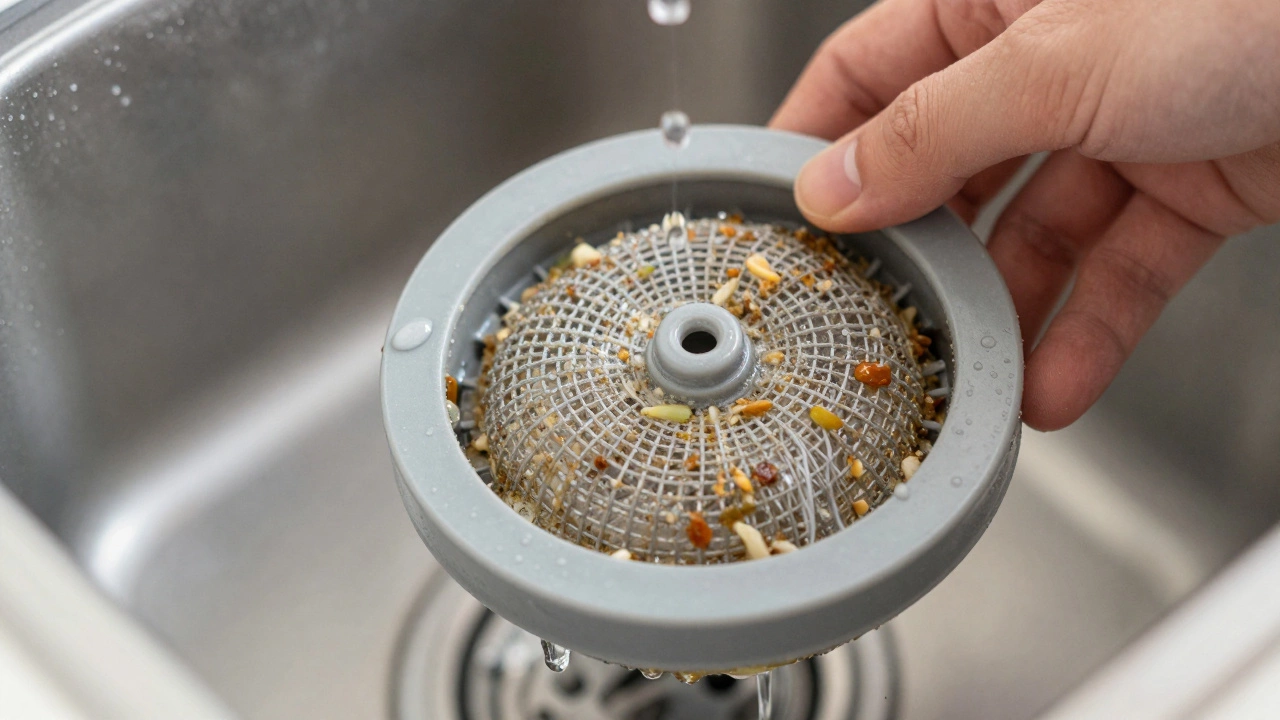
Step 3: Clean the Filter and Drain System
Poor cleaning performance or standing water at the bottom of the tub is almost always caused by drainage issues. The drain pump is a motorized component that expels wastewater from the dishwasher tub relies on clear pathways to function. Start by removing the lower rack and unscrewing the filter assembly located at the bottom of the tub. Rinse the filter under warm water to remove food particles, grease, and broken glass.
After cleaning the filter, inspect the drain hose for kinks or blockages. Disconnect the hose from the garbage disposal or sink drain pipe. Pour a bucket of water into the hose to see if it flows freely. If water backs up, there is a clog further down the line. You can use a plumber’s snake or a wet/dry vacuum to clear the obstruction. Remember, never run a dishwasher without its filter installed, as large debris can damage the pump impeller.
If the pump runs but water remains in the tub, the air gap is a device installed on the countertop or sink rim to prevent backflow of dirty water into the dishwasher might be clogged. Common in many Australian homes, air gaps can accumulate grime over time. Remove the cap and clean out any sludge. A blocked air gap causes slow draining and potential overflow.
Step 4: Check Door Latch and Thermal Fuse
A dishwasher will not start if it doesn’t detect that the door is securely closed. The door latch switch is a safety mechanism that completes the electrical circuit when the door is locked is a small but critical component. Inspect the latch hook for bends or wear. If the hook doesn’t engage fully with the strike plate, the switch won’t activate. You can test this switch with a multimeter for continuity. Press the latch manually; if the meter shows continuity when pressed but not when released, the switch is functioning correctly. If there is no continuity either way, replace the latch assembly.
Another common failure point is the thermal fuse is a safety device that cuts power to the dishwasher if it overheats. This is typically located near the heating element or behind the control panel. If the thermal fuse blows due to excessive heat, the entire unit loses power. Test the fuse for continuity. If it reads infinite resistance (open circuit), it has blown. Replace it with an identical rating. However, ask yourself why it blew. Was the vent blocked? Did the heating element short out? Fixing the root cause is essential to prevent another blowout.
Step 5: Evaluate the Heating Element and Drying Cycle
If your dishes come out cold or wet, the heating element may have failed. The heating element is a metal rod submerged in the water at the bottom of the tub that heats water for washing and evaporates moisture for drying should glow red-hot during the final stages of the cycle. Visually inspect the element for cracks, burns, or signs of corrosion. Even if it looks intact, it could have an internal break.
Use a multimeter to test the heating element for resistance. A functioning element typically reads between 10 and 40 ohms. If the reading is zero (short) or infinity (open), the element is defective. Additionally, check the wiring connections at the terminals. Loose or burnt connectors can interrupt the flow of electricity even if the element itself is fine. Tighten any loose screws and replace damaged terminals.
Note that some modern dishwashers use condensation drying rather than a heating element. In these models, ensure the exhaust fan is working and the interior surfaces are free of detergent residue, which can inhibit evaporation.
Step 6: Decode Error Codes and Control Board Issues
Modern dishwashers are equipped with electronic control boards that monitor sensors and report errors via blinking lights or digital displays. Refer to your user manual to interpret these codes. For example, a flashing light pattern might indicate a leak detected by the floor sensor, while another code could signify a temperature sensor malfunction.
If the control board receives incorrect signals from sensors like the thermostat is a sensor that measures water temperature and regulates the heating element, it may abort cycles prematurely. Test the thermostat for proper resistance values across different temperatures. If the readings deviate significantly from the manufacturer’s specifications, replace the sensor.
In rare cases, the control board itself may fail due to power surges or moisture ingress. Signs include random behavior, unresponsive buttons, or complete loss of functionality despite good power and fuses. Replacing a control board is complex and often expensive. Consider whether upgrading to a new appliance might be more economical in the long run.
| Problem | Possible Cause | Diagnostic Action |
|---|---|---|
| No Power | Tripped breaker, loose wire, faulty door switch | Check breaker, inspect wiring, test door switch continuity |
| Not Filling | Clogged inlet valve, closed water supply, low pressure | Open valve, clean inlet filter, test water pressure |
| Standing Water | Clogged filter, blocked drain hose, faulty pump | Clean filter, snake drain hose, test pump operation |
| Dishes Not Clean | Dirty spray arms, old detergent, low water temp | Clear spray arm holes, use fresh detergent, check heater |
| Loud Noises | Foreign object in pump, worn bearings, loose rack | Inspect pump area, check rack rollers, tighten hardware |
When to Call a Professional Technician
While many dishwasher issues can be resolved with DIY troubleshooting, some problems require specialized tools and expertise. If you suspect a major component failure such as the main motor, circulation pump, or control board, it’s wise to consult a licensed appliance repair technician. These parts are intricate and improper installation can lead to further damage or safety hazards.
Additionally, if your dishwasher is under warranty, attempting self-repair may void the coverage. Always check your warranty terms before disassembling the unit. In Brisbane, where humidity and heat can accelerate component wear, regular maintenance checks by professionals can extend the lifespan of your appliance significantly.
Remember, diagnosing a dishwasher problem is about elimination. Start with the simplest explanations-power, water, and filters-and work your way up to complex electronics. With patience and the right tools, you can restore your dishwasher to peak performance and keep your kitchen running smoothly.
Why does my dishwasher make a loud grinding noise?
A grinding noise usually indicates a foreign object trapped in the drain pump or impeller. Check the bottom of the tub for broken glass, bone fragments, or plastic pieces. Remove the filter and inspect the pump area carefully. If no object is found, the pump bearings may be worn out and require replacement.
Can I run my dishwasher without the filter?
No, you should never run a dishwasher without its filter. The filter protects the pump and spray arms from large debris that could cause jams or damage. Running it without the filter risks costly repairs and poor cleaning performance.
How do I reset my dishwasher if it’s stuck on an error code?
Most dishwashers can be reset by turning off the power at the circuit breaker for one minute, then turning it back on. Alternatively, hold the 'Cancel' or 'Start' button for three to five seconds. Consult your user manual for model-specific reset procedures.
Why is my dishwasher leaking water onto the floor?
Leaks can originate from several sources: a cracked door gasket, loose hose connections, a clogged drain pump, or a faulty float switch. Inspect the door seal for tears, tighten all visible hoses, and ensure the pump area is free of debris. If the leak persists, a professional inspection is recommended.
Is it worth repairing an old dishwasher?
If the repair cost exceeds 50% of the price of a new unit, it’s often better to replace it. Older models also tend to be less energy-efficient. Consider the age of the appliance, frequency of breakdowns, and availability of parts when making your decision.